Using the eClaims Download Files
The eClaims download files contain a record of the claims you submitted during a specific time period. You can use it to reconcile which claims you received payments for and which need to be followed up on. You can download these files at any time, but it is best to decide on a schedule so that you do not review the same data more than once. For example, you may choose to download and review the documents on a weekly or monthly basis. You may want to retain the older files so that you have a record of which unpaid claims remain outstanding.
Following is an example of how you might use the eClaims download files:
-
Go to the filters in the claims screen and select a date range that you want to review.
The name of the tab reflects the date that the file was downloaded. For example:

-
Compare the list of claims to the payment statements that you receive from your insurers.
-
You may want to filter your data by Insurance Company and Submit Date. This will allow you to see the claims submitted by each insurance company within a specific time frame.
You may also want to search for a claim by Insurance Co. Claim ID or Patient Name.
-
Update the Payment Received column:
-
If you have received payment for a claim, set its value to Yes.
-
If you have not received payment for a claim, set its value to No.
-
-
Follow-up on those claims that have not been paid.
-
If you downloaded the file as a .csv file, save it as an Excel file (with an .xls or .xlsx extension). Copy the tab within each consecutive file to this master Excel file so that all of your eClaims download records are in one place.

Using Microsoft Excel to filter and sort data
This section describes Excel's built-in sorting and filtering capabilities.
Activating a filter
You can use the filters to display only those rows that meet your specific criteria. For example, you may want to display data for one or more insurers or you may want to show only those rows that have not yet been paid.
-
Select anywhere in the table, then select the Filter
 button on the Data tab.
Filter
 buttons are added to the column headers, to the right of their names.
 -
Select these buttons to use the filter and sort options available to each column.
These vary depending on whether the column contains text, numbers, or dates.
Each unique value in a column is displayed a checkbox at the bottom of the pop-up, in addition to a Select All check box. In the case of dates, checkboxes are displayed in a hierarchy of years, months, and days.
Additional filtering options are available from the Text Filters, Number Filters, and Date Filters selections.
Filtering a table
-
Select the Filter
button within the appropriate column header. -
Do one or more of the following:
-
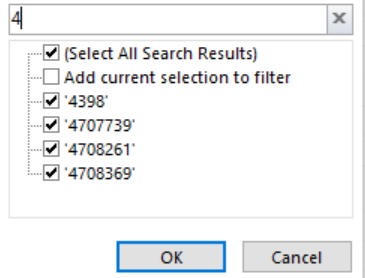
Select one or more of the checkboxes that correspond to a value, such as Insured Member, 2021, or empty rows (Blanks). Items that are not selected are hidden when the filter is applied.
To filter the list of checkboxes, enter one or more characters in the Search field above them.
-
If you are filtering a text column, select Text Filters and one of the options from the right, then enter the appropriate criteria.
For example, in the Patient Name column, you could select Contains then enter "Smith" to display all patients with that name.
Note: When a number is surrounded in quotes (' '), it is interpreted as text; as such, Insurance Co. Claim ID is a text field.
-
If you are filtering a number column, select Number Filters and one of the options from the right, then enter the appropriate criteria.
-
If you are filtering a date column, select Date Filters and one of the options from the right, then enter the appropriate criteria.
-
- Select OK to apply the filter.
Sorting a table by one column
-
Do one of the following:
-
Select the Filter
button within the column, followed by the appropriate sort option (A to Z, Z to A, Oldest to Newest, Newest to Oldest, Smallest to Largest, or Largest to Smallest). -
Select within the column you want to sort, then select the Data tab. In the Sort & Filter section, select the Sort A to Z
 or Sort Z to A
  button.
-
Sorting a table by multiple columns
-
Do one of the following:
-
Select the Filter
button within the column, then select Sort by Color > Custom Sort, or -
Select the Data tab, and in the Sort & Filter section, select the Sort
 button.
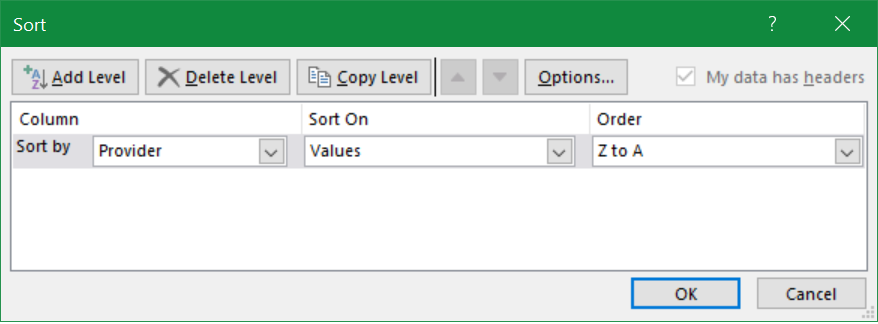
The Sort dialog box is displayed.
-
-
Select the Add Level button to add more columns to sort by.
-
Adjust the Sort On and Order values as needed.
-
Use the up and down buttons, as needed, to change the sequence in which the sort will be applied.
For example: you could sort by Insurance Company, then Submit Date.
-
Select OK.
Removing a filter or sort
-
To remove all filters and sorting, select the Data tab, and in the Sort & Filter section, select the Clear
 button.
 -
To remove a filter from a column, select the associated filter button, then select Clear Filter From <name of column>.
-
To remove a sort, sort by a different column.
Filter buttons
The following table describes the buttons that are displayed on a table header when a filter is applied.
| Button | Description |
|---|---|
|
|
The column is not sorted and no filter is applied to it. |

|
The table has been sorted in ascending order by this column. |

|
The table has been sorted in descending order by this column. |

|
The table has been sorted in ascending order by this column. The data in this column has also been filtered. |

|
The table has been sorted in descending order by this column. The data in this column has also been filtered. |

|
The data in this column has been filtered but not sorted. |
